电子健康卡插件引入
manifest.json 配置
"mp-weixin": {
	...
	"plugins": {
		"healthCardPlugins": {
			"version": "3.16.0", // 插件版本,推荐使用最新版本
			"provider": "wxee969de81bba9a45" // 填电子健康卡appid
		}
	},
},
这个插件配置也可以在pages.json里边配置,这样配置在小程序分包希望某个插件只作用于某个分包非常有用。
"plugins": {
	"healthCardPlugins": {
		"version": "3.16.0", // 插件版本,推荐使用最新版本
		"provider": "wxee969de81bba9a45" // 填电子健康卡appid
	}
}
health-card-login 电子健康卡组件
配置登录授权组件作用某个页面
{
	"path": "my/patientManagement",
	"style": {
		"navigationBarTitleText": "就诊人管理",
		"mp-weixin": {
			"usingComponents": {
				"health-card-login": "plugin://healthCardPlugins/healthCardLogin"
			}
		}
	}
},
授权 wechatCode 会有30分钟有效期,避免重复不必要的授权,调用插件login方法,直接获取 wechatCode。
const plugin = requirePlugin("healthCardPlugins")
plugin.login((isok, res) => {
	// 调试日志,联调有问题时提供
	console.log('🐞 pligin.login', isok, JSON.stringify(res))
	if (!isok && res.result.toLogin) {
		// 用户未授权,需要用户同意授权
		// 显示 healthCardLogin 登录组件,引导用户同意授权
		this.showHealthCardLogin = true;
	} else {
		this.showHealthCardLogin = false;
		const wechatCode = res.result.wechatCode;
		this.wechatCode = wechatCode;
		uni.setStorageSync('wechatCode', wechatCode);
	}
}, {
	wechatcode: true
})
health-card-login 组件获取 wechatcode
<health-card-login v-if="showHealthCardLogin" :wechatcode="true" @authSuccess="authSuccess" @authFail="authFail" @authCancel="authCancel">
	<u-button type="primary" icon="plus" text="新增就诊人"></u-button>
</health-card-login>

// 回调方法
authSuccess(e) {
	console.log('🐞 authSuccess', e);
	const wechatCode = e.detail?.result?.wechatCode;
        // 调用绑卡验证授权接口
        // 参考文档:https://open.tengmed.com/openAccess/docs/develop#112
        // 获取返回的bindCardUrl绑卡验证授权地址,web-view加载会跳转授权页面
},
authFail(e) {
	console.log('🐞 authFail', e);
	uni.showToast({
		icon: 'none',
		title: '授权失败'
	})
},
authCancel(e) {
	console.log('🐞 authCancel', e);
},
绑卡验证授权接口参数
const params = {
	wechatCode,
	patientType: 0,
	successRedirectUrl: 'mini:/pages/my/patientAddOrEdit?healthCode=${healthCode}', // 成功回跳地址
	failRedirectUrl: 'mini:/pages/my/patientAddOrEdit?regInfoCode=${regInfoCode}', // 失败回跳地址
	userFormPageUrl: 'mini:/pages/my/patientAdd?authCode=${authCode}', // 服务商填写用户信息页地址 就诊人信息录入页面
	faceUrl: '/subpackageMy/my/face', // 人脸核身回跳地址
	verifyFailRedirectUrl: 'mini:/page/my/patientAddOrEdit', // 验证失败回跳地址
}
授权过后,没有添加过健康卡的会回跳这个地址 userFormPageUrl,自定义添加就诊人页面。
填写完信息开始认证。
触发接口:验证注册/绑卡,参考: https://open.tengmed.com/openAccess/docs/develop#113
同样会获取回跳地址 “身份验证页地址”,web-view加载。
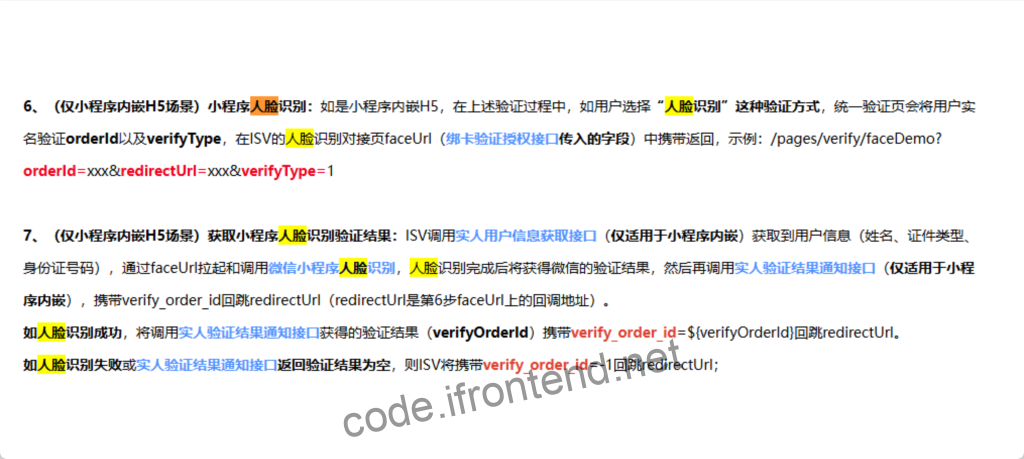
最后身份验证会有 “人脸核身 ”, 会跳转到之前配置的 faceUrl
进入这个页面后具体逻辑如下:
首先:需要 使用接口 “实人用户信息获取接口” 获取到姓名、身份证号,参考:https://open.tengmed.com/openAccess/docs/develop#118
然后:使用wx.startFacialRecognitionVerify 方法接起人脸核身(这个功能需要在小程序里申请开通,目前还不需要收费)。
//人脸识别,请求进行基于生物识别的人脸核身

startface(name, idcard) {
  wx.startFacialRecognitionVerify({
    name: _this.data.custName,//身份证名称
    idCardNumber: _this.data.custIdCard,//身份证号码
    success: function(res) {
      var verifyResult = res.verifyResult;//认证结果
       //调用接口

    },
    checkAliveType: 2,//屏幕闪烁(人脸核验的交互方式,默认0,读数字)
    fail: err => {
      wx.showToast('请保持光线充足,面部正对手机,且无遮挡')
    }
  })
},
最后:人脸核身完后会进入回调,success、fail,在回调里调用 “实人验证结果通知接口” https://open.tengmed.com/openAccess/docs/develop#119
这里需要一个 redirectUrl 再带上verify_order_id web-view组件加载就算全部完成了。
redirectUrl 这个参数如何来了,其实进入faceUrl 链接就会带入三个参数,在第一步获取到姓名、身份证号会用到两个orderId、verifyType、redirectUrl


评论0